This Post is not to hurt anyone or taunt any cultural cooking. As we can feel winter officially in the winds and it is time to get our jackets/coats, sweaters, gloves, ear warmers out .How many of you have really given it a thought about the jackets having the cooking smell/oil on them?.I can see many ‘Why do you care?’ expressions. I really about mine because few years back when I came to the US in September and my first winter getting used to the cold, wearing jackets, gloves etc, every time I went out wearing the jacket I could notice a staunch mix of onion, garlic and all spices following me from home to wherever I went, surprisingly not my husband (I thought: May be that’s the fate of the person who is cooking). Before I could figure out what it was I used to wash my hands, take a shower just before heading out still it didn’t help. This was killing my excitement of going out and one day I popped the question to my husband ‘Why is just my coat is being very smelly and not yours and added don’t think me as unclean person (Look at my ego here) and started to give explanation about my showering schedules’. To my husband that day I was a comedy piece and rather answering the question he started to LOL by my explanations. Finally he gave me the answer ‘You have to have the closet door closed while cooking and turn on the exhaust’. Since it is winter, we will not be able to open the windows and the air is being circulated inside the house and the jackets whatever laying out catches that cooking smell. Having solved the puzzle, immediately I put my jacket to wash with extra detergent and extra fabric softener .I felt happy getting back a cleaner one. From then on following few simple tips I was never a smelly Queen :).Glad I realized in my first winter.I travel to work by train and I feel many of the jackets that have lingering cooking smell. It is never a pleasant commute during winter.My profession involves many meetings in a day and sometime I would head directly to the conference room from the train station and imagine how would people's face turn if they experience a container of spices walking in.I am sure many of you are in the same situation as I am .There is very simple ways that you can have your jackets/coats, ear warmers, gloves fresh. Please if you are interested please take advantage of the following tips.
1. While Cooking always keep all the closet doors closed, if possible the doors of the bedrooms, bedroom closet doors so that your daily outfits be saved from cooking smell/oil.
2. Turn on the exhaust always when you turn on the gas stove knob.
3. If possible have the kitchen windows or patio doors open for sometime after cooking or at least for 15 minutes in winter.
4. Wash the jackets/coats and tumble dry once in three weeks if the texture is not Wool, Suede, fur or any delicate material.Dry clean once a while the delicate ones. Please always check the washing instructions on the make label before washing.
5. If dry-cleaning is a costly affair turn on the Iron with steam and Iron them, this will remove any lingering smell.
6. While hanging the jackets in the closet insert a sheet of scented fabric softener to the hanger. Change the sheet once a month.
7. Always place pack of scented baking soda /baking soda in the closets. Baking Soda is odor neutralizer and will keep the closet fresh.
8. Stow all the winter accessories in a closed closet. I would say store your wallet, bags, cell phones in a closed closet/room. It is just not the jackets that catch the cooking smell and oil; it applies to bags, mobiles etc.
9. Once the winter is over store the winter accessories in a closed bag and put it in one of your bedroom closets.
10. Place pack of baking soda in every room .Remember to put them in a place where it is not reachable by small children/kids. Baking soda is inexpensive way of keeping your house clean and fresh. Especially in shoe closets, garages, basements.
Try these out people you will feel fresh in winter. Self hygiene is very important .
Monday, November 8, 2010
Monday, October 25, 2010
Pickled Peppers
Pickled Peppers

Yes,I can see everyone's eyes opening wide to see a post from me after being dormant for so many months.Things were little crazy for the past few months and getting to normal now .Frankly speaking haven't cooked anything fancy since my last post and barely cooked to eat. Anyways we had been to vegetable picking couple of week ends back when the temperature was in 60's.It is such a wonderful sight to see fresh veggies,beans and greens and did pick a lot of them.Amongst it we had a variety of peppers and chillies ,you name it we had it in our refrigerator Jalapeno,Poblano,Anaheims,Habanero ,Indian Chilies,All kinds of bell peppers.I did try Bajjis(Fritters) ,still had bunch of them lying around.While I was chit chatting with one of my friend 'L' she mentioned I could add to salads with a dash of lemon juice.This gave me the inspiration to come up with pickled version.Before I hop on to the recipe I should say thanks to my BIL(My hubby's sister's husband) & SIL to indulge us in this wonderful experience.When they invited us for the picking , very excited along with my daughter as this is my first time vegetable picking and we have been to apple picking several times,this is entirely different .Both my SIL & BIL are wonderful persons and they live just 20 minutes away from us .They are excellent cooks ,every time we visit them we will be treated with authentic spicy south Indian meal.
This post is to two nice people in our life' V '&' B'.

Pickled Peppers
Ingredients
1.Poblano Pepper 2
2.Anaheim Pepper 2
3.Jalapeno Pepper 2
4.Indian Green Chili 3
5.Ginger 1Tsp(Grated)
6.Juice of 1 Lemon
7.Salt to Taste
Method
1.Wash and dice the peppers to small pieces.
2.In a Bowl mix all the peppers with salt,grated ginger and lemon juice.
3.Leave it for about an hour for the salt ,lemon jucie to get incorporated .
4.Enjoy with Yogurt Rice,Rotis,Parathas.
Note:
I had prepared Rava Kichdi that day,it went very well as sides.
Sunday, July 25, 2010
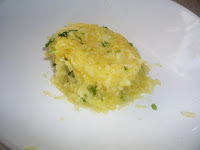
Purple Potato Saute Spiked with Chives
Purple Potato Saute Spiked with Chives

As we could feel summer officially the temperature in my part of the world on some days goes up to 107 degree F.In the months of December, January we literally cry for warmth but in summer complain about the heat .Chuckles. I found those cute little purple potatoes in the whole foods market last week and couldn’t resist buying them. Several recipes, thoughts crossed my mind .But my over growing chives plant craved some attention and I am using in all possible dishes. Chives has mild onion flavor and you could use them in Mediterranean dishes or bean salads or in anything you don’t prefer strong onion flavor. I add them to my bean salads, in whole grain crepes some times in curries. I add them to my cream cheese it is exotic as a spread along with toasted bread with olive oil and sea salt. Technically it is believed that colored potatoes provide more fiber and minerals than the white ones http://whfoods.org/genpage.php?tname=dailytip&dbid=122.Today’s recipe super simple can be prepared on stove top or in an oven. You got enough time to roast it in an oven its more crisper and tastier than the stove top ones. Enjoy it with plain rice/breads .Add couple of variety of vegetables like carrots and cauliflower to the potatoes and enjoy it with a bowl of warm boiled brown rice. Its heaven on a rainy day.

 Ingredients
Purple Potatoes -4(Medium Sized)
Chives Hand full (Chopped)
Mustard Seeds 1Tsp
Chana Dal 1Tsp
Urad Dal 1Tsp
Red Chili Powder 1Tsp
Cumin seeds /Jeera ½ Tsp
Oil 2Tsps
Salt to Taste
Method
1. Wash and Dice the potatoes along with the peel to 1inch small pieces.
2. Heat a Wide Bottomed pan and when it is ready to season add mustard seeds,urad dal,chana dal,jeera and add the diced potatoes once the mustard seeds start to splutter.
3. Sprinkle the potatoes with little water and turn it on medium flame.
4. Add salt and close the pan with a cover. Check constantly for not being burnt
5. In about 15 Minutes the potatoes will start turning to be soft .Leave it on low flame for another 5 minutes and Switch off.
6. Garnish with chives and give a toss.
7. Potatoes are ready to be consumed .Add a Cup of cooked brown rice.
Boom turns out to be a one pot meal.
Oven Version
Preheat the Oven to 350 degree farenheit
1.Wash and cut the Potatoes along with the peel to 1 inch pieces
2.Mix all other ingredients with the potatoes
3.Add the Chopped chives the last five minutes before taking the dish out of the oven.If you like the burnt flavor add them at the initial step along with the potatoes.
4.Turn the mixture into a baking bowl
5.Bake it for 30 Minutes.It is ready

As we could feel summer officially the temperature in my part of the world on some days goes up to 107 degree F.In the months of December, January we literally cry for warmth but in summer complain about the heat .Chuckles. I found those cute little purple potatoes in the whole foods market last week and couldn’t resist buying them. Several recipes, thoughts crossed my mind .But my over growing chives plant craved some attention and I am using in all possible dishes. Chives has mild onion flavor and you could use them in Mediterranean dishes or bean salads or in anything you don’t prefer strong onion flavor. I add them to my bean salads, in whole grain crepes some times in curries. I add them to my cream cheese it is exotic as a spread along with toasted bread with olive oil and sea salt. Technically it is believed that colored potatoes provide more fiber and minerals than the white ones http://whfoods.org/genpage.php?tname=dailytip&dbid=122.Today’s recipe super simple can be prepared on stove top or in an oven. You got enough time to roast it in an oven its more crisper and tastier than the stove top ones. Enjoy it with plain rice/breads .Add couple of variety of vegetables like carrots and cauliflower to the potatoes and enjoy it with a bowl of warm boiled brown rice. Its heaven on a rainy day.


Purple Potatoes -4(Medium Sized)
Chives Hand full (Chopped)
Mustard Seeds 1Tsp
Chana Dal 1Tsp
Urad Dal 1Tsp
Red Chili Powder 1Tsp
Cumin seeds /Jeera ½ Tsp
Oil 2Tsps
Salt to Taste
Method
1. Wash and Dice the potatoes along with the peel to 1inch small pieces.
2. Heat a Wide Bottomed pan and when it is ready to season add mustard seeds,urad dal,chana dal,jeera and add the diced potatoes once the mustard seeds start to splutter.
3. Sprinkle the potatoes with little water and turn it on medium flame.
4. Add salt and close the pan with a cover. Check constantly for not being burnt
5. In about 15 Minutes the potatoes will start turning to be soft .Leave it on low flame for another 5 minutes and Switch off.
6. Garnish with chives and give a toss.
7. Potatoes are ready to be consumed .Add a Cup of cooked brown rice.
Boom turns out to be a one pot meal.
Oven Version
Preheat the Oven to 350 degree farenheit
1.Wash and cut the Potatoes along with the peel to 1 inch pieces
2.Mix all other ingredients with the potatoes
3.Add the Chopped chives the last five minutes before taking the dish out of the oven.If you like the burnt flavor add them at the initial step along with the potatoes.
4.Turn the mixture into a baking bowl
5.Bake it for 30 Minutes.It is ready
Thursday, June 10, 2010
Brussel Sprouts Saute
Brussel Sprouts Saute

One reason that I am now open minded to new veggies is my husband. When he sets off for the grocery shopping I can expect to see at least one new kind of veggie or greens sitting in the veggie compartment of my refrigerator. This is how I am forced to look for or create recipes using bokchoy, brussel sprouts, passion fruit etc. Actually it’s not just veggies he is generally on the exploring side unlike me. I prefer happy path always stick to proven and safe approach in doing things. But ‘A’ wants to try and explore new things. An example for you guys to taste. During the Memorial Day long week end, we had been to an aquarium and they had simulated ocean and had like 30 sharks swimming around. They had a sign “Dare You, Swim with the Sharks”. Never in my senses had I thought it would be for true. They claim it’s all safe and we need to follow instructions like swim along with the flow in the same direction sharks are swimming. You go like deep in to the water snorkeling. Our man ‘A’ was so thrilled and got all the instructions (I doubt all the instructions reached his ears in the excitement) and ready to pay. My daughter ‘Jr A’ was super excited and was like “Go Appa Go, why are you not going”. I was about to faint by the 100 possibilities that will go wrong when he gets in to the water crossing my mind at that time.”What happens if one of the sharks loses control? What happens if the snorkeling equipment fails (didn’t strike at that moment that he is a professional swimmer)? What happens he has no energy? What happens blah blah blah? This is when I will use my emotional drama tactics when all my other tactical skills to stop fail.That will stop him and stopped him that day from swimming with the sharks. To scare me even more my daughter ‘Jr A’ is a typical of ‘A’.Sometime I feel his dynamic approach is good in making decisions while I think ,think ,think and nth time think of pros and cons and never come to a decision. So this post is to my man ‘A’. Here you go ‘A’ for you and your favorite brussel sprouts sauté.
This sauté is very simple and uses everyday ingredients that you have in your pantry. Let your creative juices flow using this recipe, mix and match combinations of basil & parsley or thyme & chives. You can even add a cup of cooked penne or bow tie or any kind of non-hairy (what I mean non hairy is not angel hair kind pasta, those long hair look like.) pastas. You have One Pot meal ready in a jiffy.
Brussel Sprouts Saute
Ingredients
Brussel Sprouts 10Nos
Red Onion 1(Diced)
Black Pepper Powder 1Tsp
Cumin Seed 1 Tsp
Cooking Vinegar /Apple Cider Vinegar 2Tsp (optional)
Oil ½ tsp
Salt to Taste
Method
1. In a wide vessel boil the Brussel Sprouts with water. Drain well after boiling.
2. In a wide bottomed pan heat the oil and when ready for seasoning add the cumin seeds, onion and sauté until onions turn slight brown.
3. Add the vinegar and in couple of minutes it gets to evaporate, add the boiled Brussel Sprouts.
4. Check for salt and give the brussel sprouts a toss so that it’s well coated with vinegar, salt and onions.
5. Leave it for a couple of minutes and add the black pepper powder. Switch off the flame.
6. For the Indian version add ½ Tsp of Garam masala and garnish with cilantro if you wish .I didn’t add it in this version but that tastes great too.
7. Can eat just as it is or with white plain basmati rice.
Note:
Vinegar is optional. You can skip if you do not have.
I always have Apple Cider Vinegar in stock so I used ACV.

Monday, May 31, 2010
Podlangai Paalkootu/Snakegourd in Sweetmilk & Vegan Version
Podlangai Paalkootu/Snakegourd in Sweetmilk & Vegan Version

This is a sweet dish but not considered as a dessert in our family .Its a traditional Iyengar dish.Both my husband and myself originate from traditional Iyengar roots.While flipping the e-pages of my blog ,realized there is no traditional Iyengar recipe ,here you go with one.This Paalkootu goes very well as sides to any spicy sambar or hot thogayal/chutney .In particular it goes very well with Vatha Kuzhambu/Mendiya kuzhambu.This Paalkootu takes its presence for sure in my maternal grand parent's house during our family get together.My maternal Grand mom mentions that this dish is my mom's favorite.My mom is the eldest in her family followed by two sisters and a brother.My Maternal grand mom is such a wonderful person she would make sure there is one favorite item of each person served during our family get together.She is an excellent cook.She never misses to prepare and make us relish our favorite dishes during our visits.This is to the great lady and Thatha.Thatha and K Ammama, I know you do not have access to internet I will have V(another cousin of mine) to take a print out of this post and read it for you.
Fresh tender snakegourd diced in to pieces and boiled along with sugar ,milk and coconut scraps garnished with cashews .Added coconut milk for the vegan version.
Podlangai Paalkootu/Snakegourd in Sweetmilk & Vegan Version
Ingredients
Snake gourd -2(Makes sure they are tender and fresh)
Sugar 2Tbsp
Rice flour 1Tsp
Milk 1/2 cup
Mustard Seeds 1/2Tsp
Oil 1/2 Tsp
To Garnish
1. 1 Tsp Broken Cashews roasted in Ghee or Oil
2.Fresh Coconut Scraps 1Tsp
Method
1.Dice the Tender Snakegourd in to small pieces .
2.Take a wide bottom vessel and add the diced snakegourd pieces and add two cups of water .Start the flame and leave it to cook on medium flame until they are soft.Do not overcook.
3.Drain the Snakegourd peices with a strainer.
4.Take a wide bottomed pan with the 1/2tsp of oil.Once oil is ready to season add the mustard seeds.
5.Add the cooked snake gourd pieces to the pan,sprinkle little water and add the sugar.Leave it to boil until the sugar dissolves.When the sugar syrup starts to thicken mix the rice flour along with the milk and add it to Sugar syrup coated pan of Snakegourd pieces.
6.Garnish with Roasted Cashews and Coconut scraps.Ready to consume and So Yum.
Vegan Version Method
1.Follow steps 1,2,3.In step 4 instead of Milk add 1/2 cup of coconut milk.Avoid the rice flour as it is added only to give a thick consistency.

Tuesday, May 18, 2010
Bhagare Baigan - Eggplants in Peanut Curry
Bhagare Baigan - Eggplants in Peanut Curry

I should have got this out typically on or before Mother's day.This is one among few other creations of mine that both my Mom and MIL relishes .During my Mom's every visit I would try to make this as many times as I can .For my MIL she tasted first time during her recent visit ,she liked it so much and I believe she prepared back in India for my FIL.There are so many reasons I could not get this out on Mother's day .Many crazy things have been happening that deviated my attention from this blog.I will catch up on all of your recipes soon.
This is to two wonderful women in my life My Mom and My MIL.
Bhagare Baigan is an authentic dish from Andhra.I learn t it from one of my Telugu friend so many years ago and I religiously follow her recipe without any variations.This has been a hit in parties,a casual dinner or a twist to the regular menu.This dish consumes little more oil than the usual frying .
Ingredients
1.Tiny Purple/Green Eggplants 10(with stalks)
2.Onion 1(Diced)
3.Garlic 1(minced)(Optional)
4.Jeera 1 Tsp
5.Mustard Seeds 1/2 Tsp
6.Oil 2 Tbsp(table spoon)
7.Salt to Tast
8.Cilantro for Garnishing.
To Grind to a Paste
1.Peanuts 1/2 Cup
2.Dhania/Coriander seeds 5 TSp
3.Red Chilies 6
4.Tamarind Size of a half lemon or 2 Tsp Paste
5.Salt 1/2 TSp
Roast the 1,2,3 Ingredients until when the peanuts start turning brown.Grind it to a paste with tamarind ,salt and little water.


Method
1.Wash the eggplants well.Do not remove the stalks.
2.Cut the eggplant from the bottom diagonally .The stalks will act as a support to hold the eggplant along with the stuffing.Do not cut deep down,the eggplants will fall part.
3.Take a spoon full of the ground peanut mixture and spoon it inside the cut eggplant gently.Stuff a little bit more if you think there is more room inside the eggplant to hold the mixture.
4.Stuff the remaining eggplants the same ways as step 2&3.
5.Heat a wide bottom pan and add the oil.When the oil is ready for seasoning add jeera,mustard seeds,diced onions,garlic and fry it until the onions start turning golden brown.
6.Add the stuffed eggplants one after one and add salt.
7.If you have ground peanut paste left add them to the pan.Check for salt .Give the eggplants,peanut mixture a gentle turn using a wooden spatula or a flat spatula for the salt to spread evenly.
8.Cover the pan and check in between so that it the eggplants doesn't get burnt.In about 20 minutes you will see the eggplants will turn tender and soft.
9.Give again a gentle turn and leave it to cook without the lid for another 5 minutes
10.The water in the gravy will evaporate and the eggplants will gel with the peanut mixture.Garnish with cilantro.
11.Bhagare Baigan tastes heavenly with plain rice ,rotis or simple sambar.

Tuesday, April 27, 2010
BCM - Spiked Cucumber Salad
BCM - Spiked Cucumber Salad

BCM-Basil,Cucumber,Mint is the abbreviation.I am using Basil in every possible dish as my basil plant is overgrowing and I do not want to waste or the leaves to dry.I used some cut basil in Pulao,in parathas,as a garnish for subjis.I was skeptical combining with Indian recipes as it might leave a pungent flavor to the dish.To my surprise not much of a big difference.I generally do not like to waste food , my mom always mentions "Food is Lakshmi" and whenever my brother and me over the dinner table show signs of wasting food she would start like "Food is Lakshmi and the wasted food would run to the ocean and cry to goddess Lakshmi and in turn Goddess Lakshmi curses with no food to that person" .She narrates this story almost every day thinking we are still toddler kids and the story continued until My brother left to do his Masters and I got married . We pretend that we believe that story and will polish off the plate clean.I am using the same tactics on my daughter pheww never works.It is believed Food is Goddess Lakshmi -symbolizes Wealth.BCM-Spiked Cucumber salad can be made in minutes before the mealtime.Its a great sides addition .
BCM - Spiked Cucumber Salad
Ingredients
1.Cuccumber 1(Large)
2.Green Chilies 2 (Minced)
3.Mint Handfull Chopped
4.Basil Handfull Chopped
5.Cilantro Handfull Chopped
6.Ginger 1/2Tsp(Grated)
7.Salt to Taste
8.Black Pepper Powder 1Tsp
To Garnish(optional)
1.1/2 Tsp Cashews Broken
2.1 Tsp Raisins

Method
1.Peel the cucumber and dice it in to small pieces
2.In a large bowl mix together the diced Cucumber,Minced Green Chilies,Grated Ginger,Chopped Basil,Cilantro,Mint,Salt and Pepper.
3.Mix all the ingredients well.
4.Garnish with Cashews and Raisins.Great Green Salad ready in minutes.
Friday, April 23, 2010
Corn Kernels In Coconut Milk Gravy
Corn Kernels In Coconut Milk Gravy

Today's corn curry , incorporated from Mallika Badrinath's cookbook.Generally I have a staunch feeling she uses way too much of garlic in curries.For example she counted 6 pods of Garlic in this curry.I am not Anti Garlic,but we do not like the strong flavor too much.Included 2 pods which was pretty strong for us.Our taste buds counts for medium spicy/sometimes less spicy .Its been a longtime I cooked by the books.Ever since internet is available 24/7 just Google.Few years back I remember before blogging became notable some of my friends and myself would visit Food sites like Bawarchi,Sify Food. Tarla Dalal's website - All rounder.But again I weren't successful on every tried recipe of Tarla Dalal's .Will jump to the recipe now and Wishing You All a Wonderful Weekend Ahead.I am looking forward to this stalking weekend after a tiresome week and previous weekend my daughter being sick,this is an awaiting one .
Corn Kernels In Coconut Milk Gravy
Ingredients
1.Yellow Corn Kernels 2 Cups
2.Organic Lite Coconut Milk 1
3.onions 1 Diced
4.oil To Season
5.Potato Boiled 1(diced)
6.Salt to Taste
7.Cilantro to Garnish
To Grind to a Paste
1.Cinnamon Stick 1/2 Inch
2.Garlic pods 2
3.Green Chilies 2
4.Coriander seeds/Dhania 1/2 Tsp
5.Cloves 2
6.Poppy Seeds/Cashews 1 Tsp

Method
1.In a Heavy bottom pan heat the oil add the onions once the oil is ready and saute until the onions turn golden brown.
2.Add the ground mixture and saute until the raw smell of the garlic wades off
3.Add the Corn kernels,Boiled Potatoes and salt.Leave it on low flame for 5 minutes for the kernels to cook.
4.Add the coconut milk and leave it for couple of minutes and switch off the flame.
5.Garnish with Cilantro.Goes well with rotis.
Tuesday, April 20, 2010
Potato Tikki/Potato Patties
Potato Patties /Potato Tikki

I would rather call it as cutlets .Tikki means cutlets.Its made of mashed boiled potato with a mix of spices.This can be categorized under street foods.I am drawing blank for the subject matter of this post.There is so much to write I have pics of dishes that I cooked still sitting in the camera's memory card .But so much happening around.My work getting crazy and we had to visit the ER over the weekend for my daughter.On Saturday night she started screaming with pain on her left ear.The next day morning she developed high temperature , I saw signs of infection and we didn't want to wait for the next weekday and took her to the ER.Yep they confirmed its ear infection and put her on antibiotics.I just wanted to get this simple dish out to you all.Potato Tikki is prepared using boiled mashed potato's mixed with your choice of veggies and spices.I ran out of bread crumbs so substituted with Besan/Chana dal flour.Do try this one.It goes very well with Tea/Coffee.
Potato Patties /Potato Tikki
Ingredients
1.Potato Boiled 2(medium Sized)
2.Garlic 2 Pods(Grated)
3.Ginger 1Tsp(Grated)
4.Green Chilies 2(Minced/Grated)
5.Carrots 1(Peeled and Grated)
6.Cilantro 2Tsp(Chopped)
7.Salt to Taste
8.Turmeric Powder 1/4Tsp
9.Oil for Shallow frying
Method
1.Mash the potato's with a masher without any lumps.
2.In a Wide bowl mix the Mashed potato,Grated carrots,Grated garlic and ginger,Minced green chilies,chopped cilantro ,Turmeric powder .
3.Add the salt to the Potato dough and mix well.
4.Make lemon sized round balls out of the potato dough.
5.Heat a Griddle/Tawa and when it is ready add 1/2 tsp of oil and spread it evenly all over the griddle using a wet paper towel and remove excess oil .This process of thin coating of oil will not make the patties to stick .
6.Take 1 Ball of potato dough ,pat it against the hands to make round discs.Repeat this with all the Potato balls.
7.Pat both sides of the discs with besan or bread crumbs.
8.Place the discs on the heated tawa and add little oil to its sides.
9.Turn them to the other side to cook.Patties both sides will turn brown and crunchier .If you want it more crispier can leave it on the griddle for another couple of minutes on both sides.
10.It goes very well with Hot and Sweet Tomato sauce.:):).
 Note:
Note:
1.While mixing the dough you can boil and add veggies like corn,peas, cabbage anything of your choice.

I would rather call it as cutlets .Tikki means cutlets.Its made of mashed boiled potato with a mix of spices.This can be categorized under street foods.I am drawing blank for the subject matter of this post.There is so much to write I have pics of dishes that I cooked still sitting in the camera's memory card .But so much happening around.My work getting crazy and we had to visit the ER over the weekend for my daughter.On Saturday night she started screaming with pain on her left ear.The next day morning she developed high temperature , I saw signs of infection and we didn't want to wait for the next weekday and took her to the ER.Yep they confirmed its ear infection and put her on antibiotics.I just wanted to get this simple dish out to you all.Potato Tikki is prepared using boiled mashed potato's mixed with your choice of veggies and spices.I ran out of bread crumbs so substituted with Besan/Chana dal flour.Do try this one.It goes very well with Tea/Coffee.
Potato Patties /Potato Tikki
Ingredients
1.Potato Boiled 2(medium Sized)
2.Garlic 2 Pods(Grated)
3.Ginger 1Tsp(Grated)
4.Green Chilies 2(Minced/Grated)
5.Carrots 1(Peeled and Grated)
6.Cilantro 2Tsp(Chopped)
7.Salt to Taste
8.Turmeric Powder 1/4Tsp
9.Oil for Shallow frying
Method
1.Mash the potato's with a masher without any lumps.
2.In a Wide bowl mix the Mashed potato,Grated carrots,Grated garlic and ginger,Minced green chilies,chopped cilantro ,Turmeric powder .
3.Add the salt to the Potato dough and mix well.
4.Make lemon sized round balls out of the potato dough.
5.Heat a Griddle/Tawa and when it is ready add 1/2 tsp of oil and spread it evenly all over the griddle using a wet paper towel and remove excess oil .This process of thin coating of oil will not make the patties to stick .
6.Take 1 Ball of potato dough ,pat it against the hands to make round discs.Repeat this with all the Potato balls.
7.Pat both sides of the discs with besan or bread crumbs.
8.Place the discs on the heated tawa and add little oil to its sides.
9.Turn them to the other side to cook.Patties both sides will turn brown and crunchier .If you want it more crispier can leave it on the griddle for another couple of minutes on both sides.
10.It goes very well with Hot and Sweet Tomato sauce.:):).

1.While mixing the dough you can boil and add veggies like corn,peas, cabbage anything of your choice.
Thursday, April 8, 2010
Sago/Sabudana Kichdi
Sago/Sabudana Kichdi

I am diving direct to the recipe today .Ingredients for this dish was concocted in a random while I was cleaning up the pantry ,I noticed a box of sago unopened.It rang a bell that one of my friend G who lives in Omaha had prepared Sago upma using onions and peanuts during our visit to her place.Her ingredients and method is completely blank for me now .I like peanuts in anything so here is the outcome.
G is my College time Buddy ,we are still in touch .She is one other reliable friend that we share our Up's and Down's.
So this is to you G.
Ingredients
1.Sago/Sabudana 1 Cup
Soak the Sago 2Hrs before by adding water just enough that the sago is covered with a very thin film of water.Do not add water too much ,will make it soggy.

To Grind
1.Peanuts 2 Tsp(roasted)
2.Green Chilies 3
3.Jeera 1 Tsp
4.Coconut Shred 1/2 Tsp
Grind all the above ingredients to a coarse mixture without adding water.
To Season
1.Oil 2Tsp
2.Mustard Seeds 1/2Tsp
3.Chana dal 1/2 Tsp
4.Urad Dal 1/2 Tsp
5.Asafoetida a dash
Sal To taste
To Garnish
Cilantro/Coriander leaves A Handfull
Method.
1.Heat a heavy bottom pan with oil and when it is ready to season add the seasoning ingredients mustard seeds,chana dal,urad dal and hing.
2.Add the soaked Sago and add the salt along with it and mix well.
3.With in 5 minutes the sago will start turning like transparent pearls.Keep it on low flame for another couple of minutes
4.Add the ground mixture and mix well.Leave it for another couple of minutes.
5.Add the cut cilantro.Cilantro brings great flavor to the dish.Add it generously in this dish.

Tuesday, March 30, 2010
Keerai Kadayal
Keerai Kadayal

keerai kadayal can be prepared with any type of greens.Keerai in Tamil is referred to "Greens".The one I am showing off here is using beet greens.Beets by itself has so much health benefits and the beet greens has innumerable proteins/nutrients packed in it.Kadayal is nothing but churning.Actually my mom/grand mom used to churn the nicely cooked greens at the end with a churner/Matthu in tamil.OMG I cannot explain the taste ,it will just melt in your mouth.I did not carry Matthu/Churner with me I simulated the same process using potato smasher.It does the same.
Keerai Kadayal
Ingredients
1.Beet Greens /Spinach: 1 Bunch Cut
2.Moong Dal : A Handful(Rinse it to get rid of dirt and grime)
3.Mustard Seeds : 1Tsp
4.Channa Dal : 1/2 Tsp
5.Urad Dal : 1/2 Tsp
6.Red Chilies :1
7.Asafoetida a Dash
8.Oil : 1/2 Tsp
9.Salt To Taste.
Method
1.In a round bottomed pan/kadai heat the oil and add the mustard seeds,chana dal,urad dal,red chilies,asafoetida
2.Add the Moong Dal ,Beet Greens ,Salt and Add 2 cups of water.Close the Pan.
3.Keep checking for the quantity of water so that during evaporation the greens do not get burnt.
4.In 20 Minutes you can see the sign of greens being cooked and moongdal turned soft and mushy.
5.Keep it for another 2 minutes for the greens and dal to get soft and tender.
6.Smash the greens and dal in the pan with a potato smasher.
7.It will taste yummy with all the flavors incorporated in one.Enjoy with hot rice and ghee.

I am sending this to Divya's Healing Food Events-Spinach originally started by Siri Healing Foods Event-Spinach.I know the event calls for spinach I just thought beet greens would be a healthy addition to the round up.
Saturday, March 27, 2010
Mooli/Radish Paratha & An Award
Mooli/Radish Paratha & An Award

Radish/Mooli an edible root vegetable overall including the leaves.Many of us discard the leaves when we buy .I usually will discard it in the stores itself.When I was making a kootu out of Beet Greens it rang a bell why shouldn't I make a dal out of radish greens too.My mom mentioned she always make dal with radish greens.She also mentioned she would ask specially for it when the vegetable walla delivers her batch of veggies.It is categorized under green leafy vegetables.According to Wiki its is believed to be used as an alternative treatment for whooping cough,cancer,gastric problems.Today's mooli paratha includes no sauteeing or steaming just grate,assemble and make.


Mooli/Radish Paratha
Ingredients
Yields : 8 Medium Sized Parathas.
1.Radish/Mooli 2 Medium sized Grated
2.Green Chilies 3Sliced
3.Turmeric Powder 1/2 Tsp
4.Garam Masala 1Tsp
5.Jeera/Cumin Seeds 1/2 Tsp
6.Salt To Taste
7.Cilantro 1Tsp Chopped
8.Oil
To Prepare the Paratha Dough
1.Whole Wheat flour 2 Cups
2.Salte to taste
Method
1.In a wide bowl take the grated mooli along with add the salt,turmeric powder,salt,green chilies,garam masala,cilantro,jeera and mix well.
2.Press the Mooli mixture to drain the liquid.Save the liquid in a cup,do not discard the drained liquid.Keep pressing the mixture until all the liquid is drained completely.
3.In another bowl take the wheat flour and add the salt.Now prepare the dough with the drained liquid from the mooli .
4.In a clean counter top/roti roller take a ball sized dough and roll it as you will do it for rotis in a circular motion.
5.Now Place a spoonfull of the mooli mixture,wrap up the sides and roll it again in a circular motion.Pat each sides with wheat flour if its too wet during rolling.
6.Heat the roti Tawa when it is ready place the Rolled Paratha and add a little bit of oil along the sides.When it is done on one side flip to the other side.The cooked paratha will puff up a little bit.
7.Enjoy with any choice of your subji .We like it with just Yogurt and Pickle.
And here is something to motivate me to keep this blog going.Aruna Manikandan of http://ensamayalkuripugal.blogspot.com/ passed on this award to me.Thanks Aruna.
I have received quite a few .To list one in college ,I am a Math Student and I was heading our Math Club and We received the Best Club of the year.Personally me for the best organized captain .One for my craft skills(don't look at me like that ,I will get this blog more creative moving forward.As this blog was started overnight on an impulse inspired by other blogs and there are so many things going in our lives that I spend very little time on blogging.Eventually I will show my skills.One for my Memory Skills.,And now something to Acknowledge my Culinary skills.

Tuesday, March 23, 2010
Coconut Milk Fried Rice
Coconut Milk Fried Rice

As I mentioned earlier I am using lite organic coconut milk in my dishes quite often.This recipe is again a simple one that I prepared it for our lunch boxes on a weekday morning.I noticed that usage of coconut milk instead of water in fried rice maintains the white color .The texture was very creamy and we liked it.This is a short post as I am writing this in my short break at work.
Coconut Milk Fried Rice
Ingredients
1.Basmati Rice 1&1/2 Cup
2.Lite coconut Organinc Milk 1Tin
3.Caroots 1/2Cup Diced
4.Green Bell Peppers Diced 1/2 Cup
5.Peas A Hand Full
6.Potato 1 Diced
8.String Beans Diced a Handfull
7.Onion 1 (Cut into 1/2)
1.Include one 1/2 in the Grind to paste Ingredient
2.The other 1/2 Dice it and keep aside
8.Oil 2Tsp
9.Cloves 2
10.Cardamom 2
11.Cinamon Stick 1/2Inch
Salt To taste
To Grind To A paste
1.Garlic 2 Pods
2.Ginger 1/2 Inch Piece
4.Onion 1/2 Onion
5.Green Chilies 2
6.Mint/Pudina A handfull
Cilantro/Coriander Leaves To Garnish
Method
1.Wash the Basmati Rice and keep it side.
2.In a Heavy bottom Pan/Kadai add the oil when it is ready to season add the cloves,Cardamom,Cinamon Stick and the 1/2 diced onion and sautee it until the onion turns golden brown.
3.Add the Ground paste and sautee until the raw smell of garlic disappears .The water from the ground paste will evaporate and it will start to thicken.
4.Add the diced veggies Carrots,Green Bell Peppers,Potato,Peas,String Beans add the salt and sautee until the veggies tends to soften.
5.Add the washed rice and sautee and add 1tin of lite organic coconut milk.Add 1/4 cup of water.
6.I usually do it in pressure cooker and leave it for 1 whistle.You can cook in Stove top or Electric cooker.
7.Garnish with Cilantro.Yum Yum.

Note
1.You can add any kind of veggies of your choice
Wednesday, March 17, 2010
Rustic Baby Red Potato Fry
Rustic Baby Red Potato Fry

I was amazed the first time when I saw the variety of potatoes available here in the USA.Its available in 4 different colors red,gold,brown and recently in the wholefood markets I am seeing the purple ones.This edible tuber is on my list to grow for this summer.It is beleived that it grows fast and easy to cultivate them.I was talking to one of my co-workers ,she is from Soviet Union and she mentioned Potatos are very vital part of their meal.She said she grew up eating potatos everyday .She said they would just sautee with anything.I agree with her its such a versatile tuber that could be combo-ed with any veggies ,greens,legumes.But I cook potatos only once in two weeks or sometimes once in three weeks .Potatos as such contains good carbs but when it is deep fried or fried in oil it adds calories.In my house we love potato fry .It shows up in my kitchen once in 2 or 3 weeks.I always have a couple of them handy ,incase if I have surprise guests or sometimes on weekdays due to lack of time I will turn them in to a quick subji/curry to go with rice or rotis.Anyway coming to its versatality I remember sometime back I saw a recipe for potato kootu.The recipe I am going to present today is a simple one.You might think what is so great about this recipe that has to show up in a blog.I feel proud to put it here ,my Toddler Daughter who is a picky eater had 3-4 of these cuties.Do you see the reason behind it :).
Ingredients:
1.Boiled Red Baby Potatos 15Nos(with skin)
2.Oil -4 tsp
To Marinate
1.Salt to taste
2.Turmeric Powder 1/2 Tsp
3.Redchili Powder 1Tsp
1.I boiled the potatos for 2 whistles in a pressure cooker.You can boil them on stove top for about 15Mins.
2. Punch the boiled potatos with a fork.This is done for the spices to get marinated well.Dont overdo.One gentle punch is good enough.
3.Marinate the Potatos with the above ingredients for about 1/2 hour.
To season
1.Mustard Seeds 1/2Tsp
2.Chana dal 1/2 Tsp
3.Urad Dal 1/2 Tsp
4.Jeera/Cumin Seeds 1/2 Tsp
5.Asfoetida a Dash
Method
1.Heat a heavy bottom pan/kadai heat the oil and add the seasonings mustard seeds,chana dal,urad dal,jeera/cumin seeds,asfoetida
2.Add the marinated Potatos.Adjust the salt
3.Fry until the potatos turn golden brown.
4.Enjoy !!!!
Note
1.If you remove the skin the marinating time can be minimized.
2.During seasoning you can add curry leaves.
3.At the end you can chopped basil or parsley.I added few chopped basil to mine.Tasted good.
Wednesday, March 10, 2010
Kande Pohe
Kande Pohe

Kande Pohe is a Maharastrian delicacy .This is a very easy recipe. I have made only very few times.The reason behind it is I have a Marathi Friend 'V' ,whenever I think of it she will prepare it for me.I will leave the authentic Maharashtrian do the magic.Pohe/Aval/Flattened Rice combined with Potatoes,Onions is "kande Pohe".I guess if you let your creative juices flow you can add any veggies to it.It will taste divine.'V' had mentioned that they have this dish during fasting/to break the fast as potatoes and Pohe are packed with good carbs and gives immense energy lost during fasting.Pohe are easily digestable form of rice.I am sure the edible tuber is the favorite veggie for most of us.Today's recipe is a courtsey from my mom ,she prepared it for our lunch boxes(She has come to stay with us for sometime :)) .She learnt it from one of those street food wallas when she and my dad made a recent trip to Jaipur.This dish always reminds me "Simplicity is Divine"
Ingredients
1. Poha Thick 2 Cups
2.Potatoed 1Cut to Small Pieces
3.Red Onions 1 Diced
4.Green Chilies 2 Cut
5.Ginger Grated 1 Tsp
6.Peanuts 2 Tsp
To Season
1.Mustard Seeds 1/2 Tsp
2.Urad Dal 1/2 Tsp
3.Chana Dal 1/2 Tsp
4.Jeera 1/2 Tsp
5.Oil 2Tsp
Hing a Das
Salt To Taste
Cilantro To Garnish
Method
1.Rinse the Poha nicely with water to get rid of the dirt and grime .Drain the water completely and set aside.
2.Heat a Pan/kadai ,with oil , add the seasonings mustard seeds,jeera,chanadal,urad dal,hing and the peanuts and saute it for about couple of minutes.
3.When the peanuts starts to light brown add the grated ginger,green chilies, onions and poatoes.Saute until the potatoes are cooked .The potatoes will turn soft when its cooked.
4.Add the pohe ,salt and mix well.Leave it on slow flame for about 5 minutes and switch off.
5.Garnish with cilantro.If you like the lemon tartness ,add some lemon juice according to your taste.For color you can add turmeric.Its heaven.

Sunday, March 7, 2010
Easy Breezy Pumpkin Ginger Pachdi
Easy Breezy Pumpkin Ginger Pachdi

We generally like to have variety at the table especially lunch during weekends.Another reason there will be extra dishes becoz only during weekends I will have time to think and do an elobrate cooking.During weekdays anything under 30-60 minutes .Usually weekdays will be a keerai kootu,one veggie and rasam or roti and subji or a thogayal,veggie and rasam or a salad,soup and rasam.Invariably I will make rasam all days since rasam is my last resort to make my daughter have her dinner if she doesn't lik the other ones.But I will give up to rasam only after few efforts.Anyway today's recipe "Pumpkin Ginger Pachdi" is a very easy and simple recipe you can make it in 10 minutes with few regular ingredients in hand.Here I go to the recipe.
Easy Breezy Pumpkin Ginger Pachdi

Ingredients
1.Yellow Pumpkin 1 Cup Grated
2.Ginger 1Tsp Grated
3.Cocount Oil/Oil 1/2 Tsp
4. Mustard Seeds 1/2 Tsp
5.Redchilies 2
6.Chana dal 1/2Tsp
7.Urad Dal 1/2 Tsp
8.Hing a Dash
9.Yogurt 2Tbsp
Salt to Taste
Method
1.In a kadai/pan heat the Coconut oil/oil and add the seasonings Mustard seeds, Rechiles,Chana dal,Urad dal,Hing .
2.Add the Grated Yellow Pumpkin ,Grated Ginger and Salt
3.Let it cook for about 5 minutes .The cooked sign is when the pumpkin starts turning soft.
4.once the pumpkin is cooked switch off the flame and add the Yogurt.Yep thats all your pachdi is ready.I added 1/2 Tsp raw EV coconut oil at the end ,it added extra flavor.
5.It can be a side dish or we like to have it with hot rice and ghee.
Notes
1.During seasoning you can add curry leaves.
2.Coconut oil adds flavor to any yogurt dishes.You can opt for any oil.
Tuesday, March 2, 2010
Easy Pepper and Potato Curry in Coconut Sauce
Easy Pepper and Potato Curry in Coconut Sauce

I have always believed coconut/coconut oil contained no good fats only saturated fats that leads to cholesterol not until before three years back I started reading good facts about Coconut .When I started researching I see in all health forums,websites and in handouts in wholefood/organic stores encourages to use fresh coconut or extra virgin coconut oil for daily cooking.It states that the fat contained in fresh coconut and EV Coconut oil are good fats .But Coconut is good consumed only fresh or EV ,if its transformed to processed forms it contains Saturated fats.EV coconut oil contains 62% MCT which means medium chain triglycerides which are fatty acids , digested by the body easily than other fats.
I never used coconut milk until recently for curries or subjis after being inspired by many blogs out there and reading the good facts about coconut I stocked my pantry with 3-4 Lite Organic Coconut milk.This curry is very simple and requires easily available ingredients.Here I go to the recipe
Easy Pepper and Potato Curry in Coconut Sauce
Ingredients
1.Green Bell Pepper 1 Diced
2.Potato Boiled 1 Diced
3.Red Onion 1Chopped
4.Tomatoes 2 Chopped
5.Green Chilies 2 Minced
6.Ginger Grated 1/2 Tsp
7.Garlic 2 Minced
8.Garam Masala 2Tsp
9.Turmeric Powder 1/2 Tsp
10.Lite Organic Coconut milk 1 can (I used Whole Foods Brand)
11.Cilantro Chopped to Garnish
12.Jeera/Cumin Seeds 1 Tsp
13. Dry fruits Roasted in Oil to Garnish (optional)
14.Salt to Taste
15.Oil 1Tsp
Method
1. Heat a Saute pan/kadai with the oil and add the jeera,garlic,green chilies,ginger,tomatoes and red onions.Saute until onions are golden brown
2.Add the green peppers ,salt and saute the veggies until the peppers become tender and add the potatoes.
3.Add the Garam masala,turmeric and the coconut milk .Let it simmer for sometime.Switch off the flame it reaches your desired consistency
4.Garnish with cilantro and chopped dry fruits.We had it with rotis.It was so yummy.Actually I added some fresh grated ginger at the end .It had a Thai flavor.Enjoy!!!!

Monday, February 22, 2010
Simple Dal Tadka
Simple Dal Tadka

The dal tadka is all time favorite in my family.We have it with hot rice or just as soup or just as a wholesomemeal by itself with a salad.When I make dal tadka I don't stick to one dal.Sometimes I use just toor dal or moong dal or jmasoor dal or mix of all the three.Today's recipe contains moong dal .This is a very simple,easy recipe yet delicious,healthy one.
Ingredients
1.Moong Dal 1cup
2.Red Onion 1chopped
3.Tomatoes 2
4.Greenchilies 3 Chopped
5.Ginger 1Tsp Grated
7. Garlic 1/2 Tsp Minced
6.Turmeric 1/2Tsp
To Season/tadka
1.1/2 Tsp Mustard Seeds
2. 1 Tsp jeera
3.Hing/Asfoetida A dash
4.Oil 1/2Tsp
5.Salt To taste
6.Cilantro to Garnish

Method
1.wash and Cook the dal along with the Tomatoes to 4 whistles.Once cooled down mash the tomatoes and dal using a ladle and keep it aside.
2.In a kadai/saute pan add the oil and when its ready for seasoning add the Mustard seeds,Hing ,Jeera,Greenchilies,Garlic,Ginger and add the chopped onions and saute it until golden brown and keep it on a low flame.
3.Add the mashed dal and tomatoes to the kadai/Saute pan .If the consistency is too thick add a cup of water.
4.Add the salt ,turmeric and let it simmer for few minutes.When it starts to thicken switch off the flame.
5.garnish it with cilantro/coriander and enjoy it as such.
Notes
In the picture I have served it with yet another simple recipe,jeera rice.The method is wash 1cup of basmati rice and In a pressure cooker add the basmati rice,1 tsp jeera,salt to taste and 1/2 tsp ghee and just add 1cup of water and switch off the flame for just 1 whistle.The water and rice proportion is 1:1 as the cooked rice should stay seperated from each other.Thats about it with jeera rice.You can cook the same way in rice cooker .
This goes to Mahimaa's Cooking Basics event
Friday, February 19, 2010
Jalepeno/Onion Chutney
Jalapeño/Onion Chutney


In my maternal house when we refer to chutney it is a side dish accompaniment. We will not have it with rice, the one we have it with rice is called Thogayal.There is no thogayal concept in my In-laws place. During the courtship period, I should say virtual courtship since my husband was in the US and me in India
Recipe Courtsey: My BIL
Jalapeno/Onion Chutney
Ingredients
1. Jalapeno Peppers -3
2. Onion -1
3. Green Chilies -2
4. Tamrind /Paste to Taste
5. Salt to taste
6. Oil 1/2 Tsp
Method
1. Peel and dice the onions. Dice the Jalapeno Peppers.
2. In a pan heat 1/2Tsp of oil, sauté the Onions and Jalapeno peppers together until the onions turn golden brown
3. In a blender add the sautéed onions, jalapeño peppers, green chilies, tamrind/paste, and salt and give it a whir.
4. The chutney is ready to accompany.
Notes
1. Generally Jalapeno peppers are not hot. If they taste hot in your area reduce the green chilies.
2.2 Green chilies were on the highs for us in terms of heat.
Friday, February 12, 2010
Tips for Sore Throat/Cold/Cough
Tips for Sore Throat/Cold/Cough
I know most of you with the snow over the weekend would have cooked like a storm.I was down with a viral fever and almost thought I caught up the flu.Good Lord it was just viral.The torture was I had a very bad sore throat and body ache that I couldn't drink even water.I almost lost like 6lbs(good for me) ,though I would want to loose the healthier way not like this.Last weekend in east coast(NJ-PA area) we had like 8inches of snow and was anticipated much earlier.Knowing about the inclement weather prior and about the fact that we are stuck in the house I had planned a bunch of recipes bookmarked to do trial and error .But viral infection played the bad part.Anyway I am now recovering and able to sit and type some tips that helped me thru this tough time.
Sore Throat
1.Boil water to rolling boil and have it sip by sip,its is really soothing to the throat and helps fight the bacteria.Sore throat is mainly caused by bacteria
2.Boil water to a bearable point that you can hold it in your mouth ,add 2 Tsp of salt and gargle.The salt helps fight against the bacteria
Fever
1.Drink lot of liquids
2.Drink lot of juice at room temperature.
3.Have Hot rice with Rasam.
4.Actually I had my DD's stock of Pedialyte, it helped me give instant energy with no food intake .Pedialyte is
Pedialyte Solution is a carbohydrate and electrolyte combination. It works by replacing electrolytes and carbohydrates in the body to prevent dehydration.Pedialyte
Cold/Cough
1.Boil water to a rolling boil add 1Tsp Vicks Vaporub and take steam bath covering your face,nose area.It helps relieve congestion
2.Fill the bath tub with warm water and add some Vicks Vaporub and soak for some time don't overdo with the time as the Vicks may irritate your skin.Probably 10mins .
If your counterpart is well versed in kitchen ,he/she can make you this Kashayam
See you all soon with some recipes from my kitchen .:):)
Tuesday, February 2, 2010
Kashayam/Home Remedy Drink For Cold,Cough & SoreThroat
Kashayam/Home Remedy Drink For Cold,Cough & Sore Throat

Its the time of the year my daughter gets her regular bout of cold .I am a hesitant mom,to administrate antibiotics for cold unless its an ear/viral infection.First hand I would try home remedies and most of the time I have seen results in a day or two with this simple today's recipe ,Kashayam.It can be prepared by just with few ingredients that are available in our pantry.The container which holds the kashayam in my picture is called "Paladai" in tamil.The highlight of the paladai is the narrow opening mouth which will not make the liquid in it to side flow ,it makes the liquid flow directly in to the throat .It is used for small babies to give milk or any form of liquid.I used it for my daughter to give this medicinal liquid during cold.It used to be a struggle initially and now the idea of Kashayam and taking it during cold has gotten in to my DD's system .Now if she sneezes or coughs she immediately asks for "Amma Kashayam".
Ingredients
1.Cinnamon Stick 1/2Inch
(Cinnamon is beleived to have cold controlling anti microbial properties and contains potential antioxidants.It also has medicianal value in cure of diabetics)
2.Black Pepper 1 TSp
Beleived to Cure Illness like Diarrehea,Indigestion,Fights against Cold causing bacterias
3.Ginger 1/2 Inch
Good for congestion and sore throat.
4.Cumin seeds/Jeera -1Tsp
Good For Indigestion/Cold Fighting effects.
5.Dania /Coriander seeds 1Tsp
Helps releiving congestion,diarrehea,Indigestion
6.Ajwain/Omam /Nigella Sativa 1Tsp
7.Athimathuram/Liquorice is the root of Glycyrrhiza glabra 1/2 inch
Helps relieving Sore Throat,Fights against cold causing bacterias.
8.Water 1cup
9.Honey - 1Tsp
10.Palm sugar Candy/Panagrkandu 1Tsp(optional)
Method
1.Pound all the dry ingredients in a Mortar and pestle or run a rolling pin on the ingredients , on a clean countertop.
2.In a vessel add the water and let it boil,when it comes to a rolling boil,add the pounded mixture of ingredients and let it boil until the water reduces to half.
3.Now add the honey.The more you boil,the more you get the essence of the herbal spices.
4.You can see the results of releif from cold,sore throat and congestion in a day or two.
Declaration: I am not a doctor or physician.This is a recipe that works for my family for relieving cold symptoms.

Thursday, January 21, 2010
Avial
Avial

Avial is a combo of veggies in coconut gravy.Its a tradiotional dish of kerela.Usually on Pongal day my mom makes Avial,Variety of Chips made out of potatoes,sweet potatoes,Raw plantains and Sweet Pongal to finish up the meal.When I started cooking I didnot try Avial for a very long time because I have always heard my mom say that,if the veggies are over cooked the taste of Avial is lost.I should say it took me few attempts not to over cook the veggies and their crunchiness is maintained.If you have variety of veggies ,I would say its the easiest to cook anytime.My Pic here doesn't show all the veggies here like carrots,sweet potatoes.I was skeptical posting it,but will change the pic when I get the right one.
Avial
Ingredients
String Beans 1/4 lb
Carrots 2
Sweet Potatoe 1/2
Potatoe 1
Chayotte squash 1
Yellow Pumkin Few Pieces Diced
Yellow Pumkin Few Pieces Diced
Peas A handfull
Raw Mangoe Few Pieces(optional)
Feel free to add any of your favorite veggies
To Grind to a Paste
Shredded Coconut 1/2 cup
Cumin Seeds/Jeera 2Tsp
Green Chilies 5 (to your taste)
Salt to your taste
Coconut Oil 2 Tsp
Curry Leaves 1spring
Mustard Seeds 1 tsp
Asfoetida/Hing A Dash
Turmeric 1/2 tsp
Yougurt 1/2 cup
Method
1.Cut the veggies to long pieces about an inch .
2.In a sautee pan take 1/2 cup water , add all the veggies and turmeric to it .Sprinkle with salt.Close the pan with a lid.Keep checking in between ,so that the veggies are not burnt. The veggies will cook by itself .The veggies should not loose its crunchiness .Its fine if its just the state of half boiled.
3.While the veggies are cooking grind together the coconut,green chilies and cumin seeds.
4.Add the ground paste to the veggies .Switch off the stove when the veggies and paste start blending together.
5.Season it in 1 Tsp of Coconut oil with Mustard seeds,curry leaves and Asfoetida/hing.
6.When the avial is ready to serve mix the yoghurt along with it and serve.It goes very well with Venpongal,Adai and with the combination of rice and appalam.

Chakara Pongal/Sweet Pongal
Chakara Pongal/Sweet Pongal

As the name goes for this dish, it’s a sweet relish. Sweet pongal is a traditional dish and is a combo of rice, moong dal and jaggery/gund/vellam along with milk, ghee and a mixture of aromatic spices. In southern part of India, in villages it is believed that when the milk boils, to its brim is a good sign for a new year to begin with prosperity. My mom used to make this sweet pongal in a vengala panai otherwise called a brass vessel .The vessel would be decorated with haldi, kumkum and Sugar cane pieces, turmeric pods tied to it on the pongal day. When the milk boils my brother and me would shout on our highest voices "Pongalo Pongal" with joy. I did not carry my vengala panai here, given during my wedding, Mine was a pressure cooker pongal.My daughter had fun screaming "Pongalo Pongal" .Here you go with the recipe.
Chakara Pongal/Sweet Pongal
Ingredients
Rice 1Cup
Moong Dal ¼ Cup
Jaggery/Gund 1 Cup
Milk 2 Cups
Water 1 Cup
Ghee ½ Cup
Cardamom Pod -3 Powdered
Clove -3 Powdered
Nutmeg/Jathikai -1/2 Spoon Powdered
Saffron a pinch
To Garnish Roast the following in 1 Tsp Ghee
Cashews -2 Tsp
Raisins - 2 Tsp
Almonds -2 Tsp
Method
1. Wash the rice, moong dal and mix it along with the milk, water and saffron in a pressure cooker and leave it for 4 whistles
2. In a pan mix the jaggrey with little water and boil it until it starts frothing and begin to form a thick consistency.
3.Smash nicely with a ladle the cooked rice and dal and add the jaggery consistency ,ghee ,powdered cardamom, clove and nutmeg to that , keep stirring it on a low flame until the pongal reaches a semi solid consistency and switch it off.
4. Garnish it with Cashew, raisins and Almonds.Voila that’s about it Enjoy!!!!

Subscribe to:
Comments (Atom)